
sae j1171 marine trim pump manual
Today, 05/04/2026, we present this manual for Sae J1171 Marine Power Trim, designed to swiftly guide you through setup and operation.
What is SAE J1171?
SAE J1171 represents a crucial standard established by the Society of Automotive Engineers, specifically addressing the performance and testing of marine power trim pumps. This standard ensures interchangeability and consistent functionality across various manufacturers’ equipment. It defines critical parameters like pump displacement, pressure ratings, and port configurations.
Adherence to J1171 guarantees that replacement pumps will seamlessly integrate with existing marine trim systems, simplifying maintenance and reducing downtime. Understanding this standard is vital for technicians, boat owners, and anyone involved in the service or repair of marine vessels utilizing power trim functionality. It promotes safety and reliability within the industry.
Purpose of Marine Trim Pumps
Marine trim pumps are essential components in modern boating, designed to adjust the angle of the boat’s drive unit – typically an outboard motor or sterndrive. This adjustment significantly impacts boat handling, performance, and fuel efficiency. By raising or lowering the drive, operators can optimize the propeller’s thrust angle for various speeds and sea conditions.
Proper trim allows for improved acceleration, higher top speeds, and a more comfortable ride. Trim pumps facilitate precise control, enabling boaters to counteract the effects of wind, waves, and load distribution. Ultimately, they enhance the overall boating experience and contribute to safer navigation.
Scope of this Manual
This manual provides comprehensive guidance for the installation, operation, maintenance, and troubleshooting of SAE J1171 compliant marine trim pumps. It is intended for qualified marine technicians and experienced boat owners possessing a foundational understanding of hydraulic and electrical systems.
We cover pump specifications, detailed installation procedures, control system operation, and preventative maintenance schedules. Troubleshooting sections address common issues, while safety precautions are emphasized throughout. This document assumes the user is familiar with general boating safety practices and adheres to all applicable regulations. Diagrams and parts lists are included for reference.

Understanding Marine Trim Systems
Marine trim systems optimize boat performance and ride comfort by adjusting the angle of the hull in the water, enhancing handling.
Components of a Typical Trim System
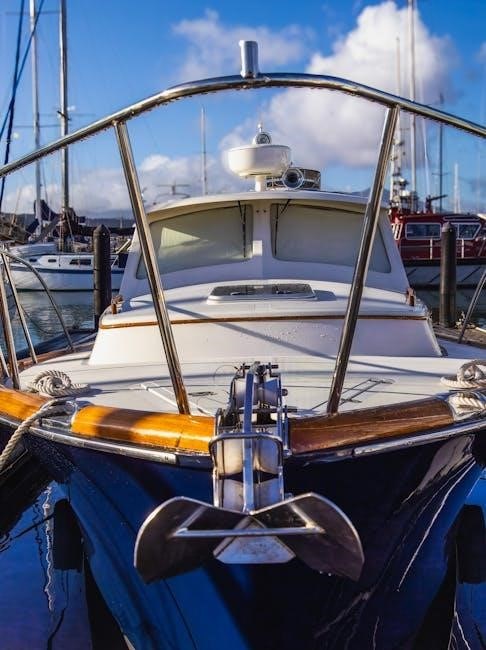
A standard marine trim system comprises several key components working in harmony. These include the trim pump itself, responsible for generating hydraulic pressure. Trim cylinders, typically mounted on the transom, convert hydraulic force into physical movement of the trim tabs or drive unit.
Hydraulic lines connect the pump to the cylinders, transmitting the fluid. An oil reservoir stores the hydraulic fluid, ensuring a consistent supply. A trim switch, located at the helm, allows the operator to control the system. Finally, hydraulic fluid is the lifeblood, transferring power, and indicators display the trim position.
How Trim Pumps Function
Marine trim pumps, adhering to SAE J1171 standards, operate on a simple yet effective principle. An electric motor drives a hydraulic pump, drawing fluid from the reservoir. This pump pressurizes the hydraulic fluid, sending it through lines to the trim cylinders.
Activating the trim switch energizes the pump, directing fluid to either extend or retract the cylinders. Releasing the switch stops the pump, holding the trim position. Internal valves within the pump control fluid direction. Proper function relies on consistent fluid levels and a sealed hydraulic system, ensuring responsive and reliable trim control.
Hydraulic Fluid Considerations
Selecting the correct hydraulic fluid is crucial for SAE J1171 compliant trim systems. Use only fluids specifically designed for marine hydraulic applications, meeting manufacturer specifications. Avoid automotive brake fluid, as it’s incompatible and can damage seals.
Fluid viscosity impacts performance; colder temperatures require lower viscosity fluids. Regularly check fluid levels and condition. Contamination from water or debris drastically reduces efficiency and causes corrosion. Fluid changes, per the maintenance schedule, are essential for longevity and optimal trim pump operation, preventing costly repairs.
SAE J1171 Compliant Pump Specifications
This section details critical pump parameters, including displacement, flow rates, pressure limits, and port configurations, ensuring adherence to SAE J1171 standards.
Pump Displacement and Flow Rate
Understanding pump displacement is crucial for optimal trim system performance. Displacement, measured in cubic inches per revolution (CIR), directly impacts the volume of hydraulic fluid moved with each pump rotation. Flow rate, typically expressed in gallons per minute (GPM), determines the speed at which the trim tabs or drive respond to commands.
SAE J1171 compliant pumps offer a range of displacement and flow rate options to suit various vessel sizes and applications. Selecting the correct pump ensures efficient operation and prevents system overload. Higher displacement pumps deliver faster trim adjustments, while lower displacement pumps provide more precise control. Always consult the vessel manufacturer’s specifications for recommended pump parameters.
Pressure Ratings and Limits
SAE J1171 establishes strict pressure ratings for marine trim pumps to ensure system safety and longevity. Maximum working pressure (MWP) defines the highest continuous pressure the pump can handle without damage. Exceeding this limit can lead to component failure and potential hazards.
Pumps are typically rated between 1000-3000 PSI. Relief valves are essential components, preventing pressure buildup beyond the MWP. Regular inspection of relief valve functionality is critical. Operating within specified pressure limits optimizes performance and minimizes wear and tear on the entire hydraulic system. Always adhere to the manufacturer’s recommended pressure settings for your specific pump model.
Port Configurations and Sizes
SAE J1171 standardizes port configurations for interchangeability and simplified installation of marine trim pumps. Common port types include NPTF (National Pipe Tapered Fuel) and SAE O-ring ports, ensuring leak-free connections. Port sizes vary based on pump displacement and flow rate, typically ranging from 1/4″ to 3/4″ in diameter.
Correct port selection is crucial for optimal hydraulic fluid flow. Using incorrect fittings can restrict flow or create leak paths. Always verify compatibility between the pump ports, hydraulic lines, and fittings before assembly. Refer to the pump’s specification sheet for precise port details and recommended torque values.

Installation Procedures
Proper installation ensures reliable operation. Securely mount the pump, connect hydraulic lines carefully, and establish correct electrical wiring for optimal performance.
Mounting the Trim Pump
Secure and stable mounting is crucial for the longevity and efficient operation of your SAE J1171 compliant trim pump. Select a location that is dry, easily accessible for maintenance, and protected from excessive vibration or impact.
Ensure the mounting surface is flat and capable of supporting the pump’s weight, even under dynamic loads. Utilize appropriate mounting hardware – bolts, washers, and locknuts – specified for marine environments to prevent corrosion.
Follow the manufacturer’s recommended torque specifications during installation. Incorrectly tightened bolts can lead to pump misalignment or damage. Verify the pump is firmly secured after installation and periodically inspect the mounting hardware for looseness.
Hydraulic Line Connections
Proper hydraulic line connections are paramount to a leak-free and efficient trim system. Always use hoses and fittings specifically rated for marine hydraulic applications, ensuring compatibility with the hydraulic fluid used.
Before connecting lines, thoroughly clean the fitting surfaces to remove any debris or contaminants. Apply a thread sealant approved for hydraulic systems to prevent leaks. Tighten connections to the manufacturer’s specified torque, avoiding over-tightening which can damage fittings.
Inspect all connections for leaks after initial installation and during routine maintenance. Routinely check hoses for cracks, abrasions, or signs of wear, replacing them as needed.
Electrical Wiring and Connections
Secure and correct electrical connections are crucial for safe and reliable trim pump operation. Always disconnect the power source before commencing any wiring work. Utilize marine-grade wiring and connectors, designed to withstand the harsh marine environment.
Follow the wiring diagram meticulously, ensuring correct polarity and secure connections. Employ appropriately sized fuses or circuit breakers to protect the electrical system from overloads.
Inspect wiring for damage, corrosion, or loose connections during routine maintenance. Properly ground the pump housing to prevent electrical shock and ensure optimal performance.

Operation and Control
Understanding the trim switch, indicators, and emergency stops is vital for safe and effective boat operation with the installed trim system.
Trim Switch Operation
The trim switch is the primary interface for controlling the marine trim pumps and adjusting the vessel’s running angle. Typically, these switches are momentary-contact types, meaning they only activate the pump while pressed. Upward deflection on the switch raises the drive unit, while downward deflection lowers it.
Holding the switch in either direction continuously activates the pump until the desired trim angle is achieved or the switch is released. Some systems incorporate a ‘trim-in’ and ‘trim-out’ function, offering precise control. Always observe the trim indicator while operating the switch to avoid over-trimming or causing cavitation.
Understanding Trim Indicators
Trim indicators provide crucial visual feedback regarding the position of your marine drive. These indicators can be analog gauges displaying a graduated scale, or increasingly, digital displays integrated into the vessel’s instrumentation. They show the current trim angle, helping operators maintain optimal performance.
Properly interpreting the indicator is vital; excessive trimming can lead to poor handling and potential damage. The ideal trim angle varies based on boat speed, load, and sea conditions. Regularly monitoring the indicator ensures efficient fuel consumption and a comfortable ride. Familiarize yourself with your specific indicator’s markings.
Emergency Stop Procedures

In an emergency, immediate action is critical. Should the trim system malfunction – exhibiting uncontrolled movement or unusual noises – the first step is to disconnect the power supply to the trim pump. Locate the circuit breaker or fuse dedicated to the trim system and switch it off immediately.
If a breaker isn’t accessible, or the issue persists, disconnect the battery. Avoid attempting repairs while the system is energized. Notify qualified marine technicians for inspection and repair. Prioritize safety; uncontrolled trim can severely impact vessel handling and create hazardous conditions.

Maintenance and Troubleshooting
Regular checks and prompt issue resolution are vital for optimal performance and longevity of your SAE J1171 marine trim pump system.
Regular Inspection Checklist
Consistent inspections are crucial for maintaining a reliable SAE J1171 marine trim pump system. Begin by visually examining all hydraulic lines for leaks, cracks, or abrasions – replace damaged lines immediately. Check pump mounting bolts for tightness, ensuring the pump remains securely fastened.
Inspect electrical connections, verifying they are clean, corrosion-free, and properly secured. Listen for unusual noises during pump operation, which could indicate cavitation or internal wear. Regularly assess the trim indicator’s functionality, confirming accurate readings. Document all inspection findings and any corrective actions taken to maintain a comprehensive maintenance record. Prioritize safety during all inspections!
Hydraulic Fluid Level Checks
Maintaining correct hydraulic fluid levels is paramount for optimal SAE J1171 trim pump performance. Locate the reservoir’s sight glass or dipstick and check the fluid level with the trim system in its fully retracted position. Ensure the fluid is within the marked “full” range; low levels can cause pump cavitation and reduced efficiency.
If the level is low, carefully add the manufacturer-recommended hydraulic fluid, avoiding overfilling. Regularly inspect the fluid’s color and clarity – dark or cloudy fluid indicates contamination and requires a fluid change. Always use clean funnels and containers during fluid checks and refills to prevent contamination.
Common Troubleshooting Issues
Several issues can arise with SAE J1171 marine trim pumps. Slow or unresponsive trim operation often indicates low hydraulic fluid or air within the system. Unusual noises, like whining or grinding, may signal pump wear or contamination. If the trim doesn’t hold position, suspect internal leaks within the pump or cylinders.
Electrical problems, such as blown fuses or faulty wiring, can also prevent operation. Always check connections and fuses before assuming pump failure. If issues persist, consult a qualified marine mechanic for diagnosis and repair, ensuring safety and proper functionality.
Replacing the Trim Pump
Pump replacement requires careful attention to detail. First, disconnect power and relieve hydraulic pressure. Carefully disconnect hydraulic lines, capping them immediately to prevent fluid loss and contamination. Remove the old pump mounting bolts and detach the unit.
Before installing the new pump, inspect the reservoir and lines for debris. Connect the hydraulic lines, ensuring proper tightening. Reconnect electrical wiring, verifying correct polarity. Bleed the system to remove air, and test operation thoroughly. Always refer to the parts list for correct replacement components.

Safety Precautions
Prioritize safety! Always disconnect power before servicing. Wear appropriate PPE, and be mindful of pressurized hydraulic systems to prevent injury.
Hydraulic System Safety
Hydraulic fluid under pressure poses significant risks. Never loosen connections while the system is energized; always relieve pressure first. Inspect hoses and fittings regularly for leaks or damage, replacing worn components immediately.
Ensure hydraulic fluid compatibility with all system components to prevent material degradation. Be aware that hydraulic fluid can be flammable; keep ignition sources away.
Properly dispose of used hydraulic fluid according to local regulations. Avoid direct contact with hydraulic fluid, as it can cause skin irritation. In case of a fluid injection injury, seek immediate medical attention – it’s a medical emergency! Always wear appropriate gloves and eye protection when working with the hydraulic system.
Electrical System Safety
Marine electrical systems present unique hazards due to the presence of water. Always disconnect the battery’s negative terminal before performing any electrical work on the trim pump or related components. Ensure all wiring connections are clean, tight, and properly insulated to prevent shorts and corrosion.
Use marine-grade wiring and connectors specifically designed for the harsh marine environment. Never overload circuits or use improperly sized fuses.
Inspect wiring for damage regularly, and replace any frayed or corroded wires immediately. If you are unfamiliar with marine electrical systems, consult a qualified marine electrician. Always follow proper grounding procedures to prevent electrical shock.
Personal Protective Equipment
Working with hydraulic and electrical systems requires appropriate safety gear. Always wear safety glasses or a face shield to protect your eyes from hydraulic fluid spray or flying debris. Gloves, preferably chemical-resistant, are essential to prevent skin contact with hydraulic fluid, which can cause irritation or burns.
Closed-toe shoes are mandatory to protect your feet from potential hazards.
When working with electrical components, use insulated tools. Consider wearing appropriate clothing to minimize skin exposure. If working in a poorly ventilated area, a respirator may be necessary. Prioritize your safety and consult safety data sheets for specific chemical handling guidelines.

Advanced Topics
Explore sophisticated integrations: ECUs, proportional control valves, and remote systems enhance trim pump functionality, offering customized performance and control options.
Integration with Electronic Control Units (ECUs)
Modern marine systems increasingly rely on Electronic Control Units (ECUs) for optimized performance and automation. Integrating the SAE J1171 trim pump with an ECU allows for sophisticated control strategies, moving beyond simple switch operation. This integration enables features like automatic trim adjustment based on vessel speed, load, and sea conditions.
ECU integration typically involves communication protocols such as NMEA 2000 or proprietary CAN bus systems. The ECU receives data from various sensors and then sends commands to the trim pump, precisely controlling its operation. This results in improved fuel efficiency, enhanced handling, and a smoother ride. Proper calibration and configuration of the ECU are crucial for optimal performance and safety.
Proportional Control Valves
Proportional control valves represent a significant advancement over traditional on/off valves in marine trim systems; These valves allow for precise and variable control of hydraulic fluid flow to the trim cylinders, resulting in smoother and more responsive trim adjustments. Unlike simple valves, proportional valves can modulate the pump’s output, offering incremental control.
Utilizing proportional valves enhances the user experience and allows for finer adjustments to vessel attitude. They are often integrated with electronic control systems, enabling automated trim functions. This technology minimizes abrupt movements, improving passenger comfort and overall vessel stability. Proper selection and calibration of the valve are essential for optimal system performance.
Remote Control Systems
Integrating remote control systems expands operational convenience for marine trim pumps, allowing adjustments from various vessel locations. These systems typically employ wireless technology, offering freedom of movement for the operator during trimming procedures. Remote controls often feature intuitive interfaces, mirroring the functionality of the primary helm station controls.
Safety features are paramount in remote systems, including emergency stop functions and secure communication protocols to prevent unintended activation. Compatibility with existing electronic control units (ECUs) is crucial for seamless integration. Proper installation and testing are vital to ensure reliable operation and prevent interference with other onboard systems, enhancing overall vessel control.

Appendix
This section contains detailed SAE J1171 standard information, comprehensive wiring diagrams, and a complete parts list for easy ordering and maintenance.
SAE J1171 Standard Details
SAE J1171 defines performance and testing criteria for marine power trim pumps, ensuring interchangeability and reliability across different manufacturers. This standard meticulously outlines requirements for pump displacement, pressure ratings, port configurations, and fluid compatibility. Adherence to J1171 guarantees consistent operation and simplifies maintenance procedures. It covers hydraulic power units specifically designed for adjusting the angle of marine drives, enhancing boat performance and handling.
The standard details testing protocols for flow rate, leakage, and durability under various operating conditions. Understanding these details is crucial for selecting the correct pump and interpreting performance data. Compliance ensures safety and optimal functionality within marine applications.
Wiring Diagrams
Detailed wiring diagrams are essential for the safe and correct installation of your SAE J1171 compliant trim pump. These schematics illustrate the connections between the pump motor, trim switch, power source, and any associated control modules or ECUs. Diagrams clearly depict wire colors, terminal designations, and grounding points, minimizing installation errors.
Pay close attention to polarity and fuse ratings to prevent damage to the electrical system. Variations exist based on trim switch type (single or dual) and vessel configuration. Always disconnect the power source before commencing any wiring work, and verify connections before energizing the system.
Parts List and Ordering Information
Maintaining your SAE J1171 trim pump requires access to replacement parts. This section details a comprehensive list of components, including pump assemblies, seals, filters, and electrical connectors. Each part is assigned a unique part number for accurate ordering.
Contact your authorized marine dealer or visit our website, providing the pump’s model number for assistance. Ensure compatibility before ordering. Diagrams illustrate part locations for easy identification. We recommend keeping a stock of frequently replaced items like filters and seals to minimize downtime and maintain optimal system performance.